Preparing to run an outbound email campaign is a challenging process.
Gathering data, segregating prospects, doing research, and crafting compelling, tailored messages.
After all these carefully executed steps, if your emails do not even get delivered to your prospects’ inbox because they got bounced, you have lost the battle before the war has even begun.
Sending emails to invalid addresses, which cause them to bounce back, is one thing that can drastically affect your sender's reputation. The higher the number of bounces on your email, the lower your sender reputation becomes. This, ultimately, has a significant impact on the deliverability of your emails, including valid ones.
In order to avoid an impact on your deliverability, you need to be thorough while cleaning out your email list. But to manually scope out all the invalid or fake emails is a burdensome task.
That’s why you need a tool that can help with email validation - to automate the process of weeding out the invalid, nonexistent, or fake emails from your prospect list.
Advantages of Email Validation
Before we talk about how to validate emails, here are some benefits of email validation:
1. Better Sender Reputation:
Every email account has a sender reputation score, which helps the recipient's Email Service Provider (ESP) to check the email's quality. Email deliverability improves when the score rises, and vice versa.
Sending emails to invalid or spammy email accounts on a regular basis can result in your email account being suspended.
Verifying your email account ensures that your emails are delivered to the intended recipient securely. This will boost your sender reputation and keep your email account in good shape
2. Decreased Bounce Rates:
When it comes to deliverability, email bounces will have you sitting at the edge of your seat. The validity and domain quality of your email account are both affected by frequent bounce backs. Your email account could be flagged as spam by many ESPs; they could also end up being blocked.
By verifying your email list prior to starting a campaign, you can easily separate the valid emails from the invalid, inevitably decreasing your bounce rates and dodging spam filters.
3. Higher accuracy rate of emails:
Before starting an email campaign, you import a list of your prospects. When you have a large list, it is difficult to individually check if each email is valid or not. This may increase the chances of your email bounces, which will then have an impact on the overall performance of your email campaign.
Verifying your email list before the campaign removes all the unwanted connections from your prospect list, reducing the risk of sending emails to invalid or spam accounts. You also get better open and reply rates, which improves the effectiveness of your email campaigns.
Methods To Validate Your Email List
1. Using an Email Validation Tool
This is the easiest way to detect if an email address is valid or not. You just need to upload your email list and the automated software will give you a list of invalid/fake emails in one go. There’s no need to manually check each email one by one, it all happens within minutes. You can successfully validate your entire list, and pay more attention to your email strategies.
There are other methods to validate email addresses as well, though they may not be as quick or efficient as using an email validation tool.
2. Checking syntax
Incorrect syntax or typographical errors are some of the most common errors in emails. They can be checked and edited manually, but it is an unpractical task.
The typical syntax of an email address contains three parts: a unique identifier, @, and domain name. eg., [email protected]
All emails should follow the same format and must not contain any spelling or typographical errors. Any other format is incorrect and is prone to bouncing back.
3. Sending an email to the account
This is a rather straightforward way to check the validity of an email, but doing so using your main email ID is unwise. It is advisable to create a phony email and then send emails to your intended recipients. This way, you can clear out all the accounts that got bounced from your email list.
However, it is unproductive as you’ll be doing the same thing twice.
4. Performing an IP address look-up
Another way to check the legitimacy of an email is to perform an IP address lookup. Each message contains an IP address of the server it originated from. You can find it in the source code or use a tool like MX Lookup.
After you’re done, you can go to any website like What is my IP Address and find out the IP details of the user’s email. If something is fishy, it could be a case of email spoofing.
While this technique can give you the location of an email address, it doesn’t help you determine the deliverability or reputation of the domain. Additionally, it can be quite hard to execute for a huge list of emails.
5. Performing a DNS lookup
It is similar to looking up an IP address, except this will give you details about the domain. You can use tools like MX DNS lookup and search for any domain name. It also tells you if the domain is on any blacklists or has any spam-related data with it.
You can determine the accuracy of the domain using this technique, but it is still not possible to know if the email will be delivered or not.
How To Validate Your Emails Using Klenty’s Email Validation Tool
Klenty offers you an in-built email validation tool that you can use to ensure that your prospect list is free of any invalid, nonexistent, or fake emails.
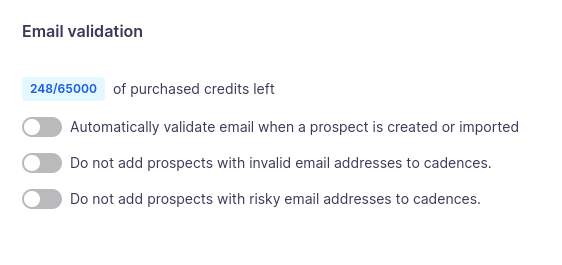
You can select prospects and perform validation manually, or opt-in to automatically validate every prospect you add to Klenty.
Head over to Settings > Deliverability > Email Validation.

- When you opt-in to automatically check every prospect as and when they are imported on Klenty, the tool will filter them as valid, invalid, or risky. You’re also open to choose whether or not you want to add risky/invalid emails to your cadence.

- You can also manually check the validity of an email by choosing a particular prospect email ID to run through the tool.
- Go to your prospect list and select the email addresses you want to validate, click on More Options and select “Validate Email”.

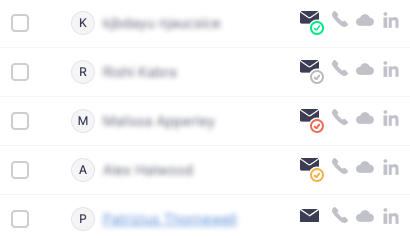
- When you get back to the prospect page, you will see one of five options on the email icon: green tick (a valid email), grey tick (in progress), red tick (an invalid email), yellow tick (a risky email), and no tick (not validated).
Conclusion
If you want to ensure that your bounce rates are below 2% and sender reputation remains at an all-time high, then email validation is your safety net. Stop double-checking every email address on your list, and focus more on converting.
Use Klenty’s Email Validation and get on the fast lane to your prospects’ inbox.


